

Have you ever wondered how to make bubble hash in a safe way with everyday tools at home?
If yes, carry on reading, because we’ll show you how in 8 ridiculously easy steps.
Here’s what we’ll breakdown:
Table of Contents:
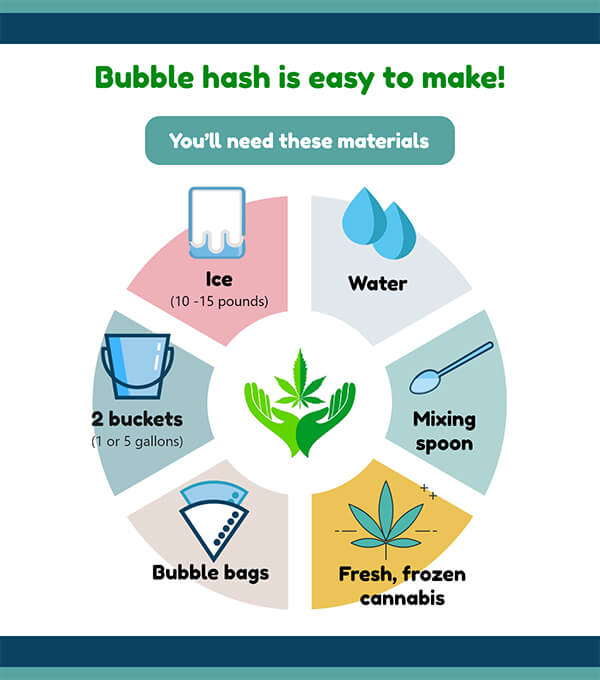
Materials You’ll Need: Buckets, cannabis, mesh screens and a few others
How to Make Bubble Hash Step by Step: Set up your station, collect your resin and dry it for use
But first, let’s go through quickly what bubble hash is and why it’s preferred over different types of hash.
What is Bubble Hash?
Bubble hash is also known as full melt hash, ice hash, water hash or solventless hash, and it stands out for primarily 3 reasons:
- Bubble hash is a solvent-free concentrate, hence the name solventless hash
- Not only is it solvent-free, it’s easy to make at home
- Last but not least, bubble hash might be the most refined form of hashish…
It’s so refined that the potency actually comes close to 60% THC, that is, if it’s made the right way.
And the right way doesn’t require state-of-the-art shiny silvery equipment, nor an advanced chemical engineering degree. Rather, all that’s needed is a little diligence, patience, mary-jane love and a handful of easily accessible materials.
Materials like these!

Don’t Feel Like Making Your Own? Don’t Worry, We’ve Got You Covered!
Materials Needed:
- 2 buckets minimum (that are either 1 or 5 gallons each)
One bucket will be used for all the filtering action, while the other will be used to hold the bubble bag with all the cannabis mixture, which we’ll get to a little later.
Tip: When you’re selecting bucket size, 1 gallon can hold 2 ounces or 56 grams of plant matter. The 5 gallon can hold up to 8 ounces or 200 grams. It’s your choice.
- 3 to 5 different size micron (u) extraction bags
Also known as bubble bags, these will have micron filters in the bottom, which will be used to refine the delectable cannabinoids into the final result. The more bags you have, the purer and higher grade the hash is.
Here’s a suggestion – have one 25u, 73u, 160u and 220u bag. Each bag must fit the bucket size you selected
- Fresh or frozen quality cannabis (trim or buds)
To ensure the highest grade bubble hash, it’s ideal to not only have high grade buds or trim, but to leave them in a freezer overnight. If you have buds – rid them of leaf, stems and seeds before doing so!
Tip: Expect 1 oz of quality trim to give you 3-4 grams of bubble hash. As for cannabis buds, expect more.
- 2 micron pressing screens (one cheesecloth or cotton muslin cloth will also do)
Your finished bubble hash will be placed on one of these materials to be dried and then stored for use
- Pressurized spray bottle (optional)
Filled with water, you might find using a pressurized spray bottle helps in collecting filtered resin at the bottom of each bag.
- Ice (10 -15 pounds)
You might be surprised to learn it’s just as important to have quality ice as it is cannabis. For instance, make sure your ice is pure and not loaded with chemicals like chlorine or fluoride. But again, regular ice will also do!
Tip: Homemade ice is probably the best way to know what quality you’ve got.
- Water: The same goes for having high-quality water, if possible.
- Towels: These will be placed beneath the blotting screen (if you decide to use on) and across the floor under the buckets to keep things neat and tidy from mixture spillage. Believe me, there’s going to be a lot of this!
- Mixing Spoon: A large mixing spoon is ideal.
- Clean and flat piece of cardboard: Resin will be placed on cardboard to be stored for around 7 days.
- Bowl of Ice Water (optional): This is optional but some people like to rinse their spoons in ice water after collecting resin from each bag.
Phew! Now that wasn’t much, was it?
With these in hand, let’s begin step 1 of how to make bubble hash.
How to Make Bubble Hash Steps
Prep time: 30 minutes | Cooking Time: 1 hour and 10 minutes | Storage Time : 7 days
Total Time : 7 days, 1 hour and 40 mins
Step 1: Set-up Your Station
Lay out all materials, making sure they’re clean and ready. This ensures the process is smooth and free of headaches.
For instance:
Towels placed on the ground with buckets on top at an arm’s distance apart. Spray bottle filled with clean water. Blotting screen, if used, with paper towels underneath for drying hash. Cheesecloth, if used instead, that’s ready to hold wet hash. Everything in a cool environment if possible.
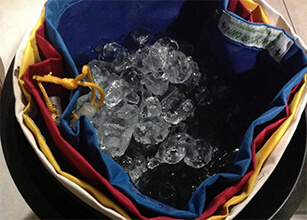
Step 2: Line Every Bubble Bag To One Bucket
Select one bucket as the mixture bucket and line every bubble bag to it, starting from the smallest to largest.
For instance, grab your smallest micron filter bubble bag and line the bottom of the bucket as you would with a plastic bag when its used as a garbage bin. Repeat this with your next smallest bubble bag, until the largest filter bag is on top.
Step 3: Fill the Top Bubble Bag With Layers of Cannabis and Ice
Divide your cannabis into equal small batches. Take the first batch and create a layer of cannabis, then, place a layer of ice on top. Repeat this pattern with more layers of weed and ice until you reach the top of the bucket. The final layer should be ice.
Note: The ice lowers the temperature so that your cannabis’ buds and trichomes freeze. This process makes it easier for cannabinoids to be isolated.
Step 4: Fill the Bucket With Water
Finally, add water to the bucket until it’s close to the lip. But not too full to the top, because it can spill and waste your materials.
Step 5: Carefully Stir the Bucket
With your prep work done, let your bucket and the water inside cool. You can put it in the refrigerator for 30 minutes to an hour if you need.
When the water’s temperature has dropped, agitate the wet plant material by stirring it up with your spoon slowly and carefully. I can’t stress carefully enough.
Continue stirring for 10-15 minutes until you have a good, thick mix.
Step 6: Strain the Bucket
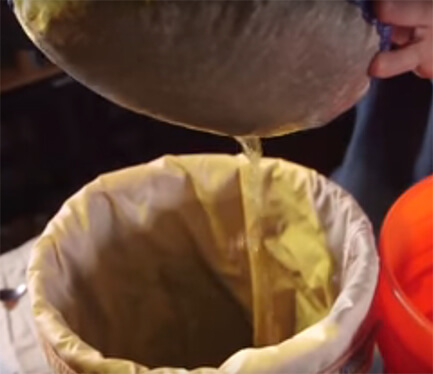
When you finish stirring, it’s time to strain your mixture.
Start by grabbing the top bag filled with the mixture only, and drain all the water into the bucket, letting it seep into the smaller bubble bags. Once the water runs out, place the bag with all the mixture into another bucket.
Step 7: Collecting the Resin and Dry it into Hash
The bag under the mixture bag will have trapped the resin! To recover it, take that bag only and line it as you previously did, but in another bucket.
Take a smaller spoon, collecting all the olive green colored resin, and scrape it onto the 25u micron pressing screen or cheesecloth. Using a credit card may help.
Repeat this step for each bubble bag! Remember to rinse the spoon before collecting again.
Note – at each new filter level, you’ll have a more pure and filtered hash. Each bubble bag carries a different grade of bubble hash, where the last and smallest bubble bag will have the purest.
Step 8: Dry and Store Your Hash
Once the resin is on the pressed screen, take another pressed screen and place it on top. Grab a hand towel, and press gently, putting pressure on the resin that’s placed in between the screens. This removes excess water.
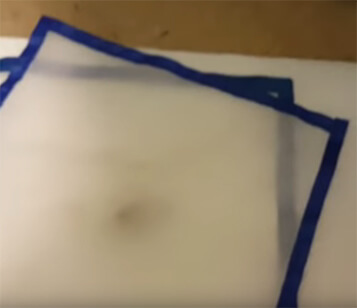
If you just have a cheesecloth, wrap it and press with your palm to squeeze the water.
Now you’re ready to dry the hash. One way of doing so, is placing it on cardboard, and storing it in a dark, cool and dry environment for around 7 days. Once it’s more solid to the touch, your hash ready to be smoked, vaporized or dabbed!
Make sure to keep it in jars for preservation.
Extra Step: Do Another Run or Two To Get The Most of The Mixture Bag
With the same mixture, you can do the process all over again to extract even more hash. Line the bags from smallest to largest, with the same mixture bag on top, add more ice and water, and strain away!
Need a Visual? Check this video out.
https://www.youtube.com/watch?v=hQ-2ooQuUkU
Ready to Make Bubble Hash?
Now, wasn’t that easy? Sure, it takes some time, from the straining process to the finished result, dried and ready to smoke. But bubble hash isn’t your ordinary hash – it’s the most concentrated!
Also remember, making concentrates is a “what you give is what you get” process, meaning the highest quality inputs creates the finest grade hash.
So enjoy! and check that “how to make bubble hash” box off your to-do list!


